ADVERTISEMENT
## How to Make 3-Ingredient Mounds Bars: Step-by-Step Guide
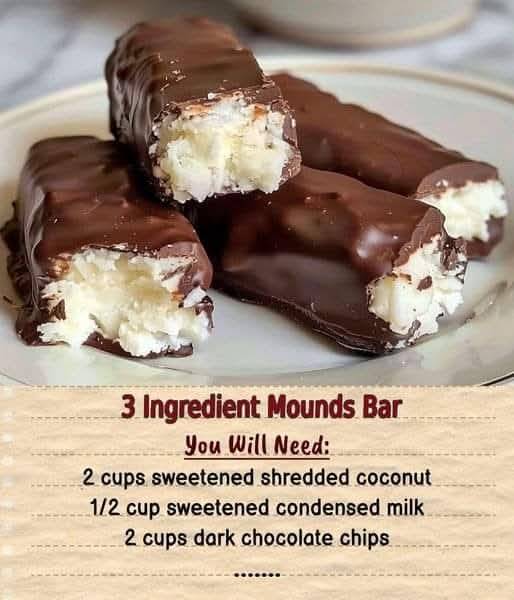
Now that you have your ingredients ready, let’s get started on making the perfect batch of **Mounds Bars**. Follow these simple steps for a decadent homemade treat that everyone will love.
### Step 1: Prepare the Coconut Filling
1. **Combine the Shredded Coconut and Sweetener**: In a mixing bowl, combine the unsweetened shredded coconut and your chosen sweetener. If you’re using liquid sweeteners like maple syrup or honey, add them to the coconut and stir well to coat the coconut evenly. The mixture should hold together when you press it with your hands but not be too wet.
2. **Adjust the Sweetness**: Taste the coconut mixture, and if you want it sweeter, feel free to add more sweetener to taste. You can also add a pinch of salt to enhance the flavors and balance the sweetness.
3. **Shape the Coconut Filling**: Once the coconut and sweetener are well combined, take small spoonfuls of the mixture and form them into small rectangular or oval shapes (similar to the size of a Mounds bar). Aim for uniform size so they cook evenly when dipped in chocolate. You can use your hands to press the mixture together tightly so that it doesn’t fall apart.
4. **Chill the Coconut Filling**: Place the shaped coconut bars on a lined baking sheet or tray and refrigerate for 10-15 minutes, or until firm. This step helps the coconut filling hold its shape when dipped in chocolate.
### Step 2: Prepare the Chocolate Coating
While the coconut mixture is chilling, prepare the chocolate coating.
1. **Melt the Chocolate**: In a microwave-safe bowl, break the chocolate into small pieces and melt it in 30-second intervals, stirring in between, until fully melted and smooth. Alternatively, you can melt the chocolate using a double boiler on the stovetop.
2. **Cool the Chocolate**: After the chocolate is melted, let it cool for a few minutes so it’s not too hot when you dip the coconut bars. You want it to be at a comfortable temperature to avoid melting the coconut mixture.
### Step 3: Coat the Coconut Bars in Chocolate
1. **Dip the Bars**: Take the chilled coconut bars one at a time and dip them into the melted chocolate, making sure to coat each one completely. Use a fork or tongs to lift the bars out of the chocolate, allowing any excess chocolate to drip off.
2. **Place on Parchment Paper**: After dipping each bar in chocolate, place it back on the lined baking sheet or tray. If you’d like, you can drizzle extra melted chocolate over the bars for a decorative touch.
3. **Chill the Chocolate Coating**: Once all the bars are dipped in chocolate, place the tray back in the fridge for at least 30 minutes, or until the chocolate has completely set. This ensures that the coating will be firm and the bars will hold their shape when you bite into them.
### Step 4: Serve and Enjoy
Once the chocolate has hardened, your **3-Ingredient Mounds Bars** are ready to be enjoyed! You can store them in the fridge or at room temperature, depending on your preference. For the best texture, keep them chilled so the chocolate remains firm and the coconut filling stays soft and chewy.
## Tips for Perfecting Your Mounds Bars
– **Use the Right Chocolate**: The chocolate coating is a critical part of these bars. Make sure you choose a chocolate that you love and that pairs well with coconut. Dark chocolate adds richness and a slightly bitter flavor, while milk chocolate gives it a creamier taste.
– **Customize the Sweetener**: Experiment with different sweeteners to find the one that works best for your taste buds. If you prefer a sugar-free option, stevia or monk fruit are great choices, but you may need to adjust the quantities for sweetness.
– **Add Flavor Enhancers**: If you want to elevate the flavor of your Mounds bars, consider adding vanilla extract, almond extract, or even a touch of cinnamon to the coconut mixture.
– **Make Them Vegan**: To make these bars completely dairy-free and vegan, make sure to use dairy-free chocolate and a vegan-friendly sweetener like maple syrup or agave.
– **Make Mini Bars**: If you’re serving these for a party or a gift, consider shaping the coconut mixture into mini bite-sized bars or balls for a fun twist.
## Storing and Leftovers
Once your bars are finished, store them in an airtight container in the fridge. They’ll last for up to two weeks, though they’re likely to be eaten long before then! If you want to extend their shelf life, you can freeze the bars for up to 3 months. To freeze, place the bars on a baking sheet and freeze until solid, then transfer them to a zip-top bag or airtight container.
## Conclusion: A Perfect 3-Ingredient Treat
**3-Ingredient Mounds Bars** are the ultimate homemade candy treat that combines the rich, satisfying flavor of chocolate with the tropical sweetness of coconut. Whether you make them as a special dessert for yourself or as a gift for loved ones, they are sure to be a hit. With only three ingredients and minimal preparation, these bars offer a healthier, customizable alternative to store-bought candy bars, making them perfect for anyone looking to indulge without all the processed ingredients.
The next time you crave something sweet, skip the store and whip up a batch of these easy, irresistible bars. With just a few simple steps, you’ll have a delicious homemade treat that’s sure to satisfy your chocolate and coconut cravings.
