ADVERTISEMENT
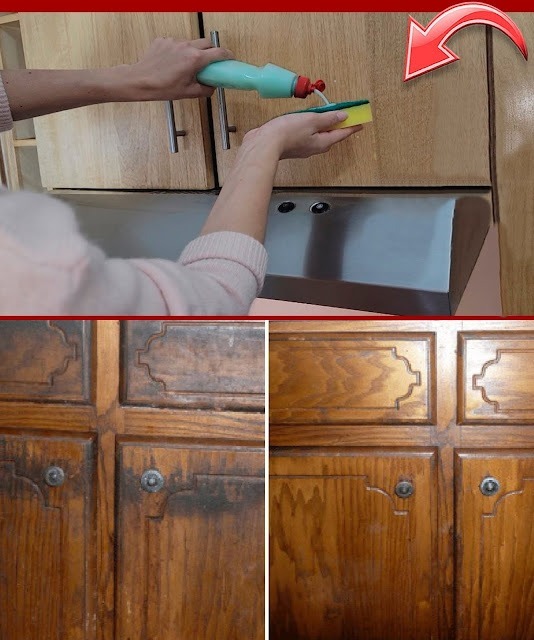
d wring it out so it’s not soaking wet. Gently wipe down your cabinet surfaces, starting from top to bottom. Focus on areas where the grease buildup is most noticeable, such as around handles, the edges of the cabinets, or near the stove. For stubborn spots, apply a little extra solution and let it sit for a minute to loosen the grease before wiping away.
Step 4: Scrub Any Tough Spots
If you encounter any particularly greasy or sticky spots, use a soft sponge or a soft-bristled brush to scrub the area. Avoid using anything too abrasive, like steel wool, as this could scratch or damage your cabinets. For really tough grime, you can apply a little more baking soda directly to the spot and scrub gently.
Step 5: Wipe with a Clean Cloth
Once the cabinets are clean, take a separate, clean microfiber cloth and dampen it with plain water to wipe away any excess solution. This will help remove any soap residue and leave your cabinets streak-free.
Step 6: Dry and Buff
After wiping down your cabinets, use a dry microfiber cloth to buff the surfaces, leaving them shiny and spotless. This also helps remove any remaining moisture that could potentially cause damage over time.
Additional Tips for Maintaining Clean Cabinets
- Regular Wiping: To keep your cabinets looking fresh longer, make it a habit to wipe down the surfaces weekly with a damp microfiber cloth. This will prevent grease and grime buildup before it becomes a bigger problem.
- Use Cabinet Liners: Consider using cabinet liners in areas where grease buildup is more common, like under the sink or around the stove. These liners are easy to clean and can help prevent grime from collecting on the cabinets themselves.
- Go Easy on Cleaning Products: While commercial cleaning products can be effective, they may contain harsh chemicals that can damage the finish of your cabinets. Stick to natural solutions like this DIY cleaning mix for a safer, more eco-friendly option.
- Pay Attention to Handles and Knobs: Don’t forget the handles and knobs! These areas often accumulate oils and dirt from frequent use. Clean them regularly to keep everything looking brand new.
Why This Tip Works
The magic behind this DIY cleaning solution lies in its ability to cut through grease while remaining gentle on your kitchen cabinets. The vinegar acts as a natural degreaser, the baking soda provides a gentle scrub, and the dish soap boosts the effectiveness of the solution. Together, they tackle even the toughest grease buildup without the need for harsh chemicals, making it safe for both your cabinets and your family.
This method is quick, easy, and incredibly effective—perfect for anyone looking to refresh their kitchen cabinets in a short amount of time without a lot of elbow grease. You’ll be amazed at how shiny and fresh your cabinets can look with just a little effort and the right tools.
Conclusion
Kitchen cabinets often take the brunt of the daily cooking chaos, so it’s no surprise they can become greasy and dirty. But with this simple DIY cleaning tip, you can easily restore them to their former glory. By using natural ingredients like vinegar, baking soda, and dish soap, you’ll get sparkling cabinets without the need for harsh chemicals or expensive cleaning products. This quick and effective solution will have your kitchen looking fresh, clean, and ready for your next culinary adventure in no time!
