ADVERTISEMENT
### **Step 4: Layer the Phyllo Dough**
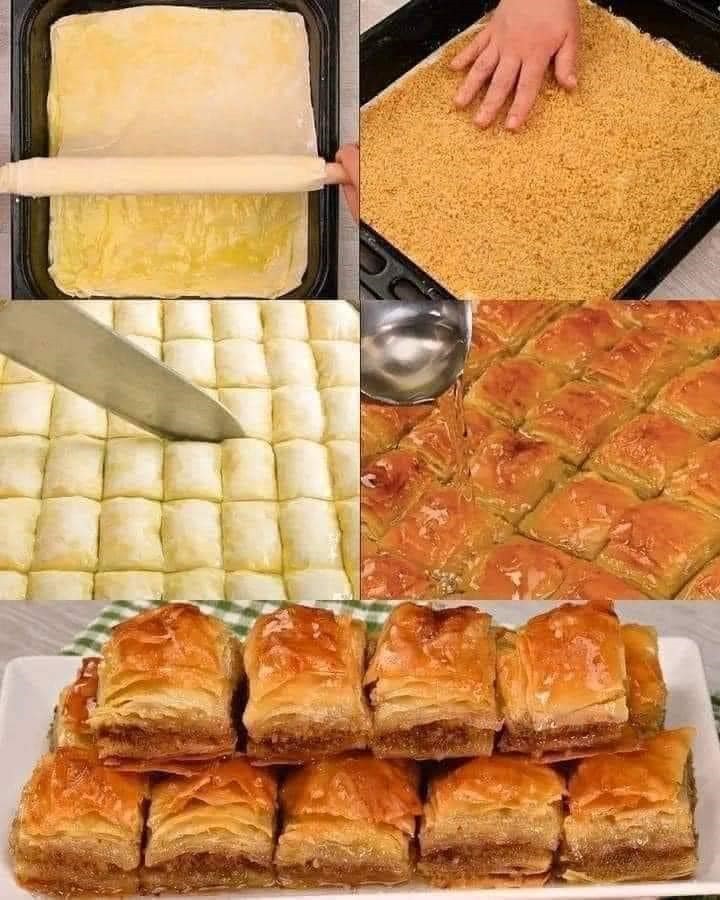
Preheat your oven to 350°F (175°C). Brush the bottom of a 9×13-inch baking dish with some of the melted butter. Begin layering the phyllo dough in the baking dish, one sheet at a time. After each sheet, use a pastry brush to lightly coat it with butter. You’ll need about 10 sheets of phyllo dough for the base layer.
Once you’ve layered 10 sheets of phyllo dough, sprinkle a thin, even layer of the chopped walnut filling over the dough. Be sure to distribute the walnuts evenly so that each bite has a balanced amount of nuts.
### **Step 5: Add More Phyllo Layers**
Continue layering the phyllo dough and walnuts, alternating between sheets of buttered phyllo and walnut filling. You should aim for 4-5 layers of nuts, depending on how thick you want the filling to be. After the final layer of nuts, finish the baklava by adding about 10 more sheets of phyllo dough, brushing each one with butter as you go.
### **Step 6: Cut the Baklava**
Before baking, use a sharp knife to cut the baklava into diamond or square shapes. This step is crucial, as it allows the syrup to penetrate the layers of pastry while baking. Be sure to cut all the way through to the bottom of the pan, but don’t worry if the layers shift a bit.
### **Step 7: Bake the Baklava**
Place the baklava in the preheated oven and bake for about 45-50 minutes, or until the phyllo dough is golden brown and crispy. Keep a close eye on it toward the end to ensure that it doesn’t burn.
### **Step 8: Prepare the Syrup**
While the baklava is baking, prepare the syrup. In a saucepan, combine the sugar, honey, and water. Bring the mixture to a boil, then reduce the heat and let it simmer for about 10-15 minutes. Add the lemon juice and cinnamon (and other spices if desired), and continue simmering for another 5 minutes. Once the syrup has thickened slightly, remove it from the heat and let it cool.
### **Step 9: Pour the Syrup Over the Baklava**
As soon as the baklava is done baking, remove it from the oven and immediately pour the cooled syrup over the hot baklava. Be generous with the syrup, ensuring that each piece gets well soaked. The syrup will soak into the layers of phyllo, creating a sticky, sweet glaze.
### **Step 10: Let the Baklava Cool**
Allow the baklava to cool completely at room temperature. As it cools, the syrup will set, and the phyllo dough will become crisp and flaky. Once cooled, the baklava will be ready to serve.
## **Serving Christmas Baklava with Walnuts**
Baklava is best served at room temperature. Cut the baklava along the lines you made earlier to create individual pieces, either in diamond or square shapes. The flaky layers, sweet syrup, and crunchy walnut filling will melt in your mouth, making each bite a delightful treat.
### **Storage Tips**
Baklava can be stored at room temperature in an airtight container for up to a week. It can also be frozen for longer storage. To freeze baklava, place it in an airtight container and store it in the freezer for up to 2 months. When you’re ready to serve it, let it thaw at room temperature.
## **Variations and Tips for Christmas Baklava with Walnuts**
– **Other Nuts:** While walnuts are traditional in many baklava recipes, you can also use other nuts such as pistachios, almonds, or hazelnuts. For a more decadent version, consider combining two or more types of nuts.
– **Flavored Syrup:** You can infuse the syrup with additional flavors, such as orange zest, rose water, or vanilla extract, to give your baklava a unique twist.
– **Spices:** In addition
to cinnamon, consider adding a pinch of ground cardamom, nutmeg, or ginger to the filling or syrup for an extra layer of holiday flavor.
## **Conclusion**
Christmas Baklava with Walnuts is the perfect dessert to make your holiday season extra special. With its rich, flaky texture, crunchy walnut filling, and sweet syrup, this indulgent treat is sure to impress your guests and satisfy your sweet tooth. Whether you’re serving it at a family gathering, a holiday dinner party, or as a gift for loved ones, baklava is a timeless dessert that brings joy to any occasion.
The process of making baklava might seem complex, but with a little patience and careful attention to detail, you’ll be rewarded with a beautiful and delicious dessert that’s perfect for the holidays. So, gather your ingredients, preheat the oven, and get ready to enjoy a slice of homemade Christmas Baklava with Walnuts that’s bursting with flavor and holiday cheer!
