ADVERTISEMENT
## 5. How to Make Kimchi at Home: A Step-by-Step Guide
Now that you have your ingredients ready, let’s go through the step-by-step process to make kimchi at home.
### **Step 1: Prepare the Vegetables**
– Cut the napa cabbage into quarters or halves, depending on its size. If you’re using Korean radish, peel and cut it into thin matchstick-like pieces.
– Rinse the vegetables well and pat them dry.
### **Step 2: Salt the Cabbage**
– Place the cabbage pieces in a large bowl and sprinkle generously with salt. Massage the salt into the cabbage leaves to help it soften. The salt will help draw out excess moisture from the cabbage.
– Let the salted cabbage sit for about 2-3 hours, turning the pieces occasionally to ensure even salting.
### **Step 3: Prepare the Kimchi Paste**
– While the cabbage is resting, make the kimchi paste. In a small bowl, combine the gochugaru, garlic, ginger, fish sauce (or its alternative), sugar, and a bit of water to create a paste. Adjust the amount of gochugaru to suit your spice preference.
– Blend everything together until it forms a smooth, thick paste. If needed, add a bit more water to reach your desired consistency.
### **Step 4: Rinse and Drain the Cabbage**
– After 2-3 hours, rinse the salted cabbage thoroughly to remove excess salt. Drain the cabbage in a colander.
### **Step 5: Coat the Cabbage with the Paste**
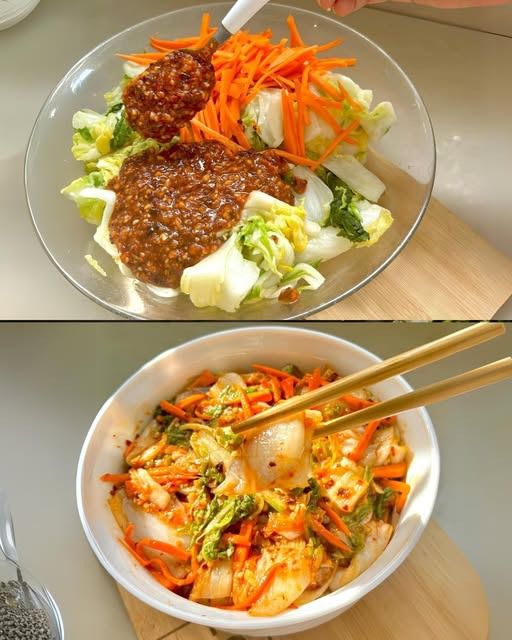
– Wearing gloves to protect your hands from the spice, take each piece of cabbage and coat it generously with the kimchi paste. Be sure to cover all sides of the cabbage leaves. If you’re using other vegetables, like radish or green onions, coat them with the paste as well.
### **Step 6: Pack the Kimchi Into Jars**
– Once all the vegetables are coated, pack them tightly into a clean, sterilized jar or container. Be sure to press the kimchi down to eliminate any air bubbles and create space for the liquid to cover the vegetables.
### **Step 7: Ferment the Kimchi**
– Seal the jar or container and leave it at room temperature for 1-2 days, depending on the ambient temperature. Fermentation time can vary, so taste the kimchi after 1 day and see if it’s reached your preferred level of tanginess.
– If you like your kimchi more fermented, let it sit for another day or two. You’ll notice the kimchi will become more sour as it ferments.
### **Step 8: Refrigerate and Enjoy**
– Once your kimchi has reached the desired level of fermentation, store it in the refrigerator. The cold temperature will slow down the fermentation process, allowing you to enjoy your homemade kimchi for several weeks.
—
## 6. Tips for Perfecting Your Kimchi
Making kimchi at home is an art, and with practice, you’ll perfect your technique. Here are some tips to help you along the way:
1. **Use Fresh, High-Quality Ingredients**: The quality of the vegetables and spices will have a significant impact on the flavor of your kimchi. Always use fresh, crisp vegetables and high-quality gochugaru for the best results.
2. **Adjust the Spice Level**: The spice level can be customized to suit your taste. If you prefer milder kimchi, reduce the amount of gochugaru or use a milder chili powder.
3. **Fermentation Time**: Keep an eye on your kimchi during fermentation. If you live in a warmer climate, it may ferment faster, so taste it early to ensure it doesn’t over-ferment.
4. **Use Gloves**: The gochugaru can be very spicy and may irritate your skin. Wearing gloves during the preparation process can help avoid any discomfort.
—
## 7. Kimchi Variations: Different Types to Try
Kimchi is incredibly versatile, and there are many different variations to explore. Some common types of kimchi include:
1. **Baechu Kimchi**: The classic napa cabbage kimchi, which is the most popular version.
2. **Kkakdugi**: A variety of kimchi made with diced Korean radish instead of cabbage.
3. **Oi Kimchi**: A cucumber-based kimchi, perfect for summer.
4. **Chonggak Kimchi**: Made with young radish, known for its crunchy texture.
Feel free to experiment with different vegetables and seasoning to create your own unique kimchi!
—
## 8. Common Mistakes to Avoid When Making Kimchi
1. **Over-Salting**: Too much salt can make your kimchi too salty. Be sure to rinse your cabbage thoroughly after salting.
2. **Improper Fermentation**: Don’t leave your kimchi out for too long or in an overly warm area. Keep an eye on the fermentation process and adjust as necessary.
3. **Using Non-Sterilized Containers**: Always sterilize your jars or containers to prevent any unwanted bacteria from interfering with the fermentation process.
—
## 9. How to Store and Serve Your Kimchi
Kimchi should be stored in an airtight container in the refrigerator to slow down the fermentation process. It can be enjoyed in various ways, including as a side dish, topping for rice, or mixed into stews like kimchi jjigae.
—
## 10. Conclusion: Kimchi as a Healthy and Flavorful Staple
Making kimchi at home is a simple and rewarding experience that allows you to enjoy this health-boosting, probiotic-rich dish at your convenience. By following a few easy steps, you can create a batch of kimchi that will complement many of your meals and provide numerous health benefits. So, roll up your sleeves, gather your ingredients, and start making your very own kimchi today!
ADVERTISEMENT
ADVERTISEMENT
