ADVERTISEMENT
os is present)
Step-by-Step Process for Removing Popcorn Ceilings
1. Prepare the Room
Start by removing all furniture or covering it with plastic drop cloths. Protect the floor as well, using tarps or old sheets. The popcorn removal process can get messy, so it’s essential to shield your furniture and flooring from dust and debris. Be sure to tape down the edges of the plastic with painter’s tape to prevent it from shifting.
2. Test for Asbestos (If Your Ceiling Is Old)
If your home was built before the 1980s, your popcorn ceiling may contain asbestos, a hazardous material that requires special handling. Before beginning, it’s a good idea to get a sample of your ceiling tested. If the test comes back positive for asbestos, consider hiring a professional asbestos removal service. If the test is negative, or your ceiling was installed after the 1980s, you can proceed with the project yourself.
3. Wet the Ceiling
The next step is to wet the popcorn texture so that it can be scraped off easily. Use a garden sprayer or a spray bottle filled with warm water. Lightly mist the ceiling with the water, but avoid soaking it too much. Allow the water to sit for about 10-15 minutes so that it can loosen the popcorn texture. If the ceiling doesn’t come off easily after the first attempt, you can reapply the water and wait a little longer.
4. Scrape Off the Popcorn Texture
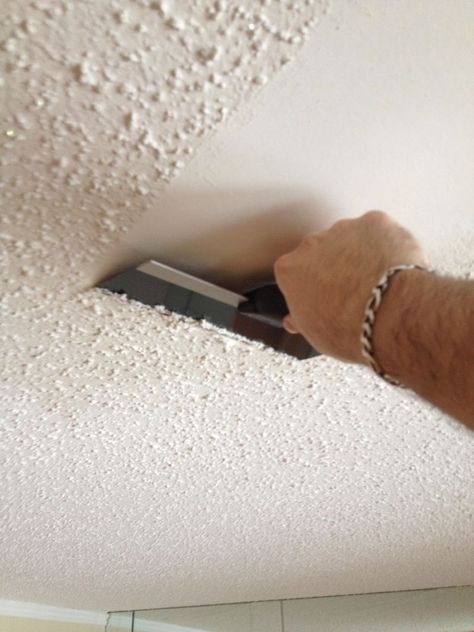
Once the ceiling is damp, it’s time to scrape away the popcorn texture. Use a drywall scraper or putty knife to gently scrape the texture from the ceiling. Be sure to work slowly and carefully to avoid damaging the underlying drywall. Start in a small section, then move to the next until the entire ceiling is clear. The popcorn texture should come off in large chunks, but if you encounter areas that are stubborn, try misting them with a bit more water.
5. Smooth the Ceiling
After removing all the popcorn texture, the ceiling may look uneven or damaged. This is normal, especially if the scraper caused minor gouges. Use joint compound to fill in any imperfections. Apply the compound with a drywall knife, then smooth it out with a wide putty knife. Allow the joint compound to dry completely, then sand it down with a fine-grit sanding block or drywall sander for a smooth finish.
6. Prime and Paint
Once the ceiling is dry and smooth, apply a primer to help the paint adhere properly. Use a high-quality ceiling primer and cover the entire surface evenly. After the primer has dried, you can paint the ceiling with your desired color. It’s best to use flat ceiling paint for a smooth and even finish. You may need two coats to get the perfect look.
Tips for Success
- Go Slow: Patience is key! Take your time during each step, especially when scraping off the popcorn texture and smoothing the ceiling.
- Don’t Rush the Watering Step: Make sure the ceiling is thoroughly soaked before attempting to scrape off the texture. The wetter the ceiling, the easier the texture will come off.
- Wear Protective Gear: Always wear a dust mask, gloves, and protective eyewear to avoid inhaling any dust and to keep yourself safe during the process.
- Consider Hiring Help for Large Rooms: If you’re dealing with a large area, consider getting a second person to help. It’s also a good idea to rent a drywall sander to make the sanding process easier.
- Clean as You Go: Popcorn ceiling removal can be messy, so keep a shop vacuum or broom nearby to clean up any debris as you go. This will make the process more manageable and less frustrating.
Alternatives to Removing Popcorn Ceilings
If you decide that scraping off the popcorn ceiling is more work than you’re willing to take on, there are a few alternatives:
- Cover It with a New Ceiling: You can cover the popcorn texture with drywall or a ceiling panel system. This will give you a smooth finish without having to scrape anything off.
- Spray Textured Ceiling: If you still like the texture but want a more modern version, consider using a knockdown texture. It’s less rough than traditional popcorn ceilings and gives a contemporary look.
Conclusion: Transform Your Space with a Smooth Ceiling
Removing popcorn ceilings may seem like a big task, but with the right tools and techniques, it’s a manageable project that can completely transform the look of your home. Whether you’re doing it for aesthetic reasons, to increase your home’s value, or to improve the overall atmosphere, a smooth ceiling can make a huge difference.
Just take your time, be patient, and use proper safety precautions, especially if you’re dealing with older ceilings that might contain asbestos. By following these steps, you’ll be able to remove the popcorn texture and create a modern, sleek finish that will make your space feel brand new. Happy renovating!
