ADVERTISEMENT

**The Most Practical Yeasted Pişi Recipe: A Fluffy, Golden Delight** If you’re looking for a recipe that brings comfort and satisfaction to every bite, **Yeasted Pişi** is an absolute must-try. A beloved pastry in many cultures, particularly in Turkey, pişi is a type of fried dough that’s crispy on the outside and soft and pillowy on the inside. While traditional pişi recipes can vary, this **practical yeasted version** is easy to make and results in the perfect balance of texture and flavor. Whether you’re enjoying it as a breakfast treat, a savory snack, or alongside a warm bowl of soup, this yeasted pişi will quickly become a go-to recipe in your kitchen. ### What Makes This Yeasted Pişi Recipe Special? – **Fluffy Texture**: The yeast in the dough creates a beautifully light and airy texture. Each bite is tender, pillowy, and simply melts in your mouth. – **Quick and Simple**: Unlike other pastries that can take hours to prepare, this yeasted pişi recipe is straightforward and relatively quick to make, without compromising on taste. – **Versatile**: You can enjoy it on its own, dusted with powdered sugar for a sweet treat, or filled with savory ingredients like cheese, herbs, or olives for a more substantial snack or meal. – **Golden Perfection**: When fried, the pişi develops a golden-brown, crispy exterior, creating a delightful contrast to the soft, airy interior. ### Ingredients for Yeasted Pişi To make these fluffy, golden delights, you’ll need: – **2 ½ cups all-purpose flour** – **1 packet (or 2 ¼ teaspoons) active dry yeast** – **1 teaspoon sugar** – **¾ cup warm water** – **1 teaspoon salt** – **2 tablespoons olive oil (or vegetable oil)** – **½ cup milk** (optional, for a richer dough) – **Vegetable oil**, for frying – **Optional toppings or fillings**: powdered sugar (for sweet pişi), feta cheese, olives, or herbs (for savory pişi) ### Instructions for Making Yeasted Pişi #### Step 1: Activate the Yeast In a small bowl, combine the warm water, sugar, and yeast. Stir gently and let it sit for about 5–10 minutes, until the mixture becomes frothy. This step is essential as it activates the yeast, ensuring your pişi turns out light and airy. #### Step 2: Prepare the Dough In a large mixing bowl, combine the flour and salt. Once the yeast mixture is ready, pour it into the flour, along with the milk (if using) and olive oil. Mix everything together until a dough begins to form. Knead the dough on a lightly floured surface for about 5-8 minutes, or until it becomes smooth and elastic. If the dough is too sticky, add a little more flour, one tablespoon at a time. Be careful not to add too much flour, as the dough should remain soft and pliable. #### Step 3: Let the Dough Rise Place the dough in a lightly oiled bowl, covering it with a clean kitchen towel or plastic wrap. Allow it to rise in a warm place for about 1 to 1.5 hours, or until it has doubled in size. The yeast will work its magic, giving the dough a light and airy texture. #### Step 4: Shape the Pişi Once the dough has risen, punch it down to release any air bubbles. Divide the dough into small, equal-sized portions. Roll each portion into a ball, then flatten each ball into a disk, about ¼ inch thick. You can also use a rolling pin to flatten the dough if you prefer a more uniform shape. #### Step 5: Fry the Pişi Heat a generous amount of vegetable oil in a deep pan or skillet over medium heat. You’ll want enough oil to submerge at least half of the pişi at a time. Test the oil temperature by dropping a small piece of dough into the pan—if it sizzles and rises to the surface, the oil is ready. Carefully add the flattened dough disks to the hot oil, frying a few at a time. Don’t overcrowd the pan to ensure the pişi fry evenly. Cook each piece for 2-3 minutes on each side, or until golden brown and crispy. Once fried, remove the pişi from the oil and place them on a paper towel-lined plate to drain excess oil. #### Step 6: Serve and Enjoy Your yeasted pişi is now ready to enjoy! Serve it warm as-is or sprinkle with powdered sugar for a sweet treat. If you prefer savory pişi, you can stuff the dough with fillings such as crumbled feta cheese, olives, or herbs before frying. ### Tips for the Perfect Yeasted Pişi – **Resting the Dough**: The key to a fluffy pişi is giving the dough enough time to rise. Don’t rush this step, as it helps the yeast create the airy texture that makes pişi so delicious. – **Oil Temperature**: Ensure the oil is hot enough for frying—if the oil is too cold, the pişi will absorb too much oil and become greasy. If it’s too hot, the outside will cook too quickly and the inside will remain raw. – **Shape Variations**: While traditional pişi is round, you can experiment with different shapes, such as oval or square, depending on your preference. – **Filling Ideas**: For a savory twist, consider adding your favorite fillings. Cheese, spinach, or ground meat make excellent options for a more substantial meal. – **Sweet Variations**: If you’re making sweet pişi, you can dust the finished pastries with cinnamon sugar, or even drizzle with honey or chocolate sauce for extra indulgence. ### Why You Should Try This Yeasted Pişi Recipe This **Yeasted Pişi** recipe is the perfect combination of simplicity and indulgence. It’s incredibly versatile—whether you want a sweet snack to accompany your afternoon tea or a savory bite to enjoy at any time of the day, this recipe delivers. The best part? This practical version doesn’t require any special equipment or ingredients, and the steps are easy to follow, even for beginners. With minimal effort, you’ll have a batch of pişi that’s perfect for sharing with family and friends or simply enjoying on your own. Once you make this yeasted pişi, it will quickly become a family favorite. So, gather your ingredients, get ready for some delicious frying, and enjoy this golden, crispy, and fluffy treat that’s sure to bring joy to your table!
ADVERTISEMENT

Step 3: Let the Dough Rise

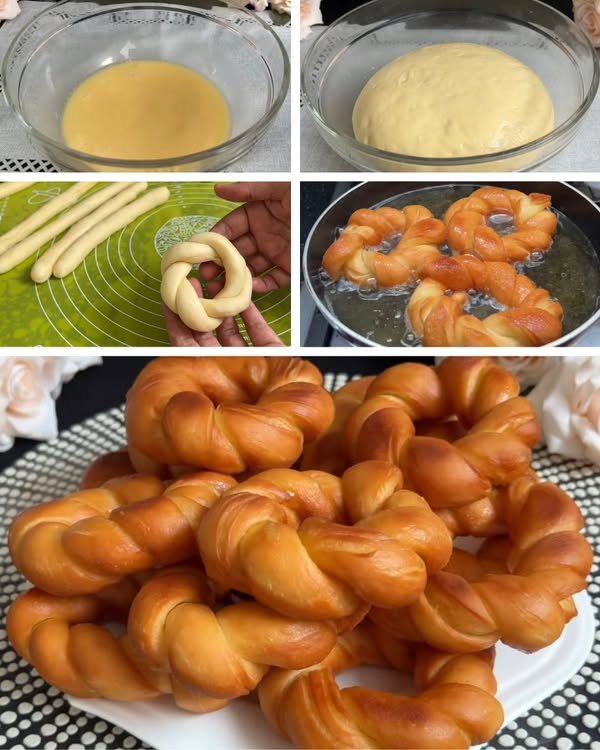
Place the dough in a lightly oiled bowl, covering it with a clean kitchen towel or plastic wrap. Allow it to rise in a warm place for about 1 to 1.5 hours, or until it has doubled in size. The yeast will work its magic, giving the dough a light and airy texture.

Step 4: Shape the Pişi

Once the dough has risen, punch it down to release any air bubbles. Divide the dough into small, equal-sized portions. Roll each portion into a ball, then flatten each ball into a disk, about ¼ inch thick. You can also use a rolling pin to flatten the dough if you prefer a more uniform shape.

Step 5: Fry the Pişi

Heat a generous amount of vegetable oil in a deep pan or skillet over medium heat. You’ll want enough oil to submerge at least half of the pişi at a time. Test the oil temperature by dropping a small piece of dough into the pan—if it sizzles and rises to the surface, the oil is ready.

Carefully add the flattened dough disks to the hot oil, frying a few at a time. Don’t overcrowd the pan to ensure the pişi fry evenly. Cook each piece for 2-3 minutes on each side, or until golden brown and crispy. Once fried, remove the pişi from the oil and place them on a paper towel-lined plate to drain excess oil.

Step 6: Serve and Enjoy

Your yeasted pişi is now ready to enjoy! Serve it warm as-is or sprinkle with powdered sugar for a sweet treat. If you prefer savory pişi, you can stuff the dough with fillings such as crumbled feta cheese, olives, or herbs before frying.

Tips for the Perfect Yeasted Pişi

  • Resting the Dough: The key to a fluffy pişi is giving the dough enough time to rise. Don’t rush this step, as it helps the yeast create the airy texture that makes pişi so delicious.
  • Oil Temperature: Ensure the oil is hot enough for frying—if the oil is too cold, the pişi will absorb too much oil and become greasy. If it’s too hot, the outside will cook too quickly and the inside will remain raw.
  • Shape Variations: While traditional pişi is round, you can experiment with different shapes, such as oval or square, depending on your preference.
  • Filling Ideas: For a savory twist, consider adding your favorite fillings. Cheese, spinach, or ground meat make excellent options for a more substantial meal.
  • Sweet Variations: If you’re making sweet pişi, you can dust the finished pastries with cinnamon sugar, or even drizzle with honey or chocolate sauce for extra indulgence.

Why You Should Try This Yeasted Pişi Recipe

This Yeasted Pişi recipe is the perfect combination of simplicity and indulgence. It’s incredibly versatile—whether you want a sweet snack to accompany your afternoon tea or a savory bite to enjoy at any time of the day, this recipe delivers.

The best part? This practical version doesn’t require any special equipment or ingredients, and the steps are easy to follow, even for beginners. With minimal effort, you’ll have a batch of pişi that’s perfect for sharing with family and friends or simply enjoying on your own.

Once you make this yeasted pişi, it will quickly become a family favorite. So, gather your ingredients, get ready for some delicious frying, and enjoy this golden, crispy, and fluffy treat that’s sure to bring joy to your table!