ADVERTISEMENT
- Prepare the Dough: In a large mixing bowl, combine the flour, sugar, salt, and yeast. Stir these dry ingredients together to ensure they’re well distributed.
- Add the Wet Ingredients: Create a well in the center of your dry ingredients, and add the lukewarm water, vegetable oil, and yogurt (if using). Mix with a wooden spoon or your hands until the dough begins to come together. If you’re using an egg, beat it lightly and add it to the mixture for a richer, softer dough.
- Knead the Dough: Once the dough starts coming together, turn it out onto a floured surface and knead it for about 8-10 minutes until smooth and elastic. If the dough is too sticky, add a little more flour, but be careful not to overdo it. You want a soft, slightly tacky dough that is easy to work with.
- Let the Dough Rise: Place the kneaded dough back in the bowl, cover it with a clean kitchen towel, and let it rise in a warm spot for about 1 hour, or until it has doubled in size. The yeast will work its magic, creating that light and airy texture that’s characteristic of yeasted pişi.
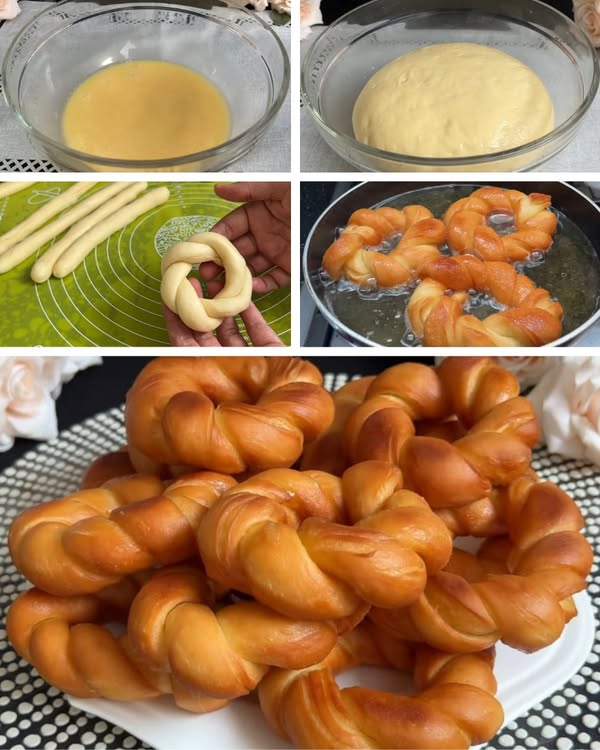
- Shape the Pişi: After the dough has risen, punch it down to release any air bubbles. Turn the dough out onto a floured surface and divide it into small balls, about the size of a golf ball. You should be able to get about 8-10 small portions, depending on the size you prefer.
Using a rolling pin, roll each ball of dough into a flat disc, about 1/4 inch thick. You can make them slightly thicker or thinner, depending on your personal preference, but be mindful of making them too thin, as they’ll cook too quickly and may not remain soft inside.
- Fry the Pişi: Heat a deep skillet or frying pan over medium heat and add enough oil to submerge the pişi discs halfway. The oil should be hot enough that a small piece of dough dropped into it sizzles immediately, but not smoking.
Carefully place the rolled dough into the hot oil, one at a time. Fry the pişi for about 2-3 minutes on each side, or until they’re golden brown and crispy. Be sure not to overcrowd the pan; fry in batches if necessary.
- Drain and Serve: Once the pişi are golden and crispy, remove them from the oil and place them on a plate lined with paper towels to drain excess oil.
Serve immediately while they’re still warm! You can enjoy them plain, or serve them with a variety of toppings or fillings like honey, cheese, olives, or jam.
Tips for Perfect Yeasted Pişi
- Don’t rush the rising process: For the best results, give the dough enough time to rise. This ensures that the pişi will be light and fluffy on the inside.
- Oil temperature: Make sure the oil is hot enough before frying, but not smoking. If the oil is too cold, the dough will absorb too much oil and become greasy.
- Filling options: If you want to get creative, consider adding some fillings to your pişi. You can stuff the dough with cheese, herbs, or even ground meat before frying.
- Serve with a side: Pişi pairs wonderfully with a variety of accompaniments. Try it with a simple salad, yogurt, or a hot cup of Turkish tea for the full experience.
Why You’ll Love This Yeasted Pişi Recipe
- Light and Fluffy Texture: Thanks to the yeast, these pişi are incredibly airy on the inside, offering the perfect contrast to their crispy, golden exterior.
- Simple Ingredients: With just a few basic pantry items, you can create this delicious fried dough without needing any special equipment or complicated steps.
- Customizable: Whether you enjoy them plain or filled with savory or sweet fillings, pişi can be easily adapted to suit your taste.
- Perfect for Sharing: This recipe makes several pieces, so it’s perfect for family gatherings or sharing with friends over tea. It’s the kind of dish that brings people together!
Final Thoughts
This yeasted pişi recipe is one of the most practical and delightful ways to enjoy fried dough, whether you’re treating yourself to a special breakfast or looking for a quick and easy snack. Its simple ingredients and versatile nature make it an ideal addition to any meal. So, the next time you’re in the mood for something warm, crispy, and utterly delicious, give this recipe a try. We guarantee it’ll become a favorite in your kitchen!
Enjoy the heavenly combination of soft, fluffy insides and golden, crispy exteriors—and savor the delicious tradition of Turkish pişi with every bite!
