ADVERTISEMENT
### **The Magic of an Upside-Down Cake**
Upside-down cakes have a long history, with the most famous being the **pineapple upside-down cake**, which was first popularized in the 1920s. These cakes are unique because they are baked with the fruit placed at the bottom of the pan, and when they are flipped over, the fruit becomes the topping, creating a beautiful, caramelized presentation. The concept of the upside-down cake is simple yet brilliant: the fruit releases its natural juices, which mix with sugar and butter to form a luscious, sticky topping as the cake bakes. Once flipped, the fruit remains at the top, creating an aesthetically pleasing and moist cake.
Using **bananas** in an upside-down cake is a twist on the traditional pineapple version. Bananas have a natural sweetness and moisture that lend themselves well to baking, making them the perfect fruit for this type of cake. The caramelized banana topping provides a rich flavor and a stunning look that makes the cake irresistible. And because the recipe uses just two bananas and a few other ingredients, it’s the perfect option for a quick dessert that packs a big flavor punch.
### **The Super Simple Recipe: Upside-Down Banana Cake with Only 1 Egg and 2 Bananas**
Now that we know the basic concept of an upside-down cake, let’s get to the recipe itself. The best part? This banana cake uses only **1 egg** and **2 bananas**—ingredients that are likely already in your kitchen. Here’s the simple recipe that will make you look like a pro baker in no time.
#### **Ingredients**
**For the banana topping:**
– 2 ripe bananas (preferably overripe for maximum sweetness)
– 4 tablespoons unsalted butter (melted)
– ½ cup brown sugar (light or dark)
**For the cake batter:**
– 1 large egg
– 1 cup all-purpose flour
– ½ teaspoon baking powder
– ¼ teaspoon baking soda
– 1/3 cup white sugar (granulated)
– ½ teaspoon vanilla extract
– ¼ cup milk (you can use any type of milk—dairy or non-dairy)
– ¼ teaspoon salt
– 1 tablespoon melted butter or oil (optional, for extra richness)
#### **Instructions**
1. **Prepare the Pan and Preheat Oven**
Start by preheating your oven to 350°F (175°C). Grease an 8-inch round cake pan or a similar-sized pan with butter or non-stick spray. Once the pan is prepared, set it aside.
2. **Make the Banana Topping**
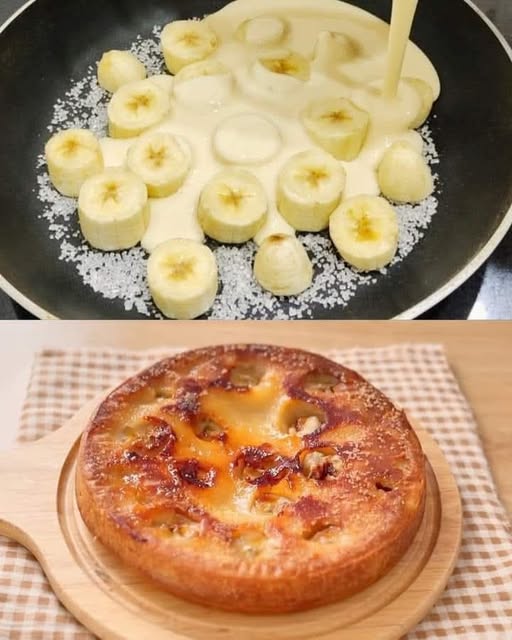
Peel the two ripe bananas and slice them into thin rounds. In a small bowl, combine the **melted butter** and **brown sugar**, stirring until the sugar dissolves and the mixture becomes smooth. Pour this mixture into the prepared cake pan, spreading it evenly across the bottom. Arrange the banana slices over the butter-sugar mixture, making sure they cover the bottom of the pan evenly. You can create a neat pattern or simply scatter the banana slices, depending on your preference.
3. **Prepare the Cake Batter**
In a separate bowl, whisk the **egg** and **white sugar** together until light and fluffy. This will take about 2-3 minutes. Add in the **vanilla extract** and continue to whisk. In another bowl, sift together the **flour**, **baking powder**, **baking soda**, and **salt**. Gradually add the dry ingredients to the wet mixture, alternating with the **milk**. Mix gently to combine. The batter should be smooth but thick.
4. **Pour the Batter Over the Bananas**
Pour the cake batter carefully over the banana slices in the pan, spreading it evenly with a spatula. Don’t worry if it looks a little uneven; the batter will spread out and settle as it bakes.
5. **Bake the Cake**
Place the cake in the preheated oven and bake for 30 to 35 minutes, or until the top is golden brown and a toothpick inserted into the center of the cake comes out clean. The cake should rise and develop a slight dome in the center.
6. **Cool and Flip the Cake**
Once baked, allow the cake to cool in the pan for about 5-10 minutes. Then, carefully run a knife around the edge of the pan to loosen the cake. Place a large plate or platter on top of the pan and quickly flip the cake over. Gently lift the pan off, and you’ll see the beautifully caramelized banana topping.
7. **Serve and Enjoy**
Slice the cake and serve it while it’s still warm for the best experience. The bananas will have formed a luscious, sticky topping that will melt in your mouth with every bite.
For Complete Cooking STEPS Please Head On Over To Next Page Or Open button (>) and don’t forget to SHARE with your Facebook friends
ADVERTISEMENT
ADVERTISEMENT
