ADVERTISEMENT
 Where and How to Leaven Bread for Perfect Results
One of the keys to making perfect homemade bread is understanding the crucial process of leavening. Leavening refers to the way dough rises, creating a light, airy texture in the final bread. Whether you’re a beginner or an experienced baker, knowing where and how to leaven bread can make all the difference in achieving that perfect loaf. So, let’s dive into the world of bread leavening, explore the best methods, and learn how to perfect your bread-baking skills.
 What Is Leavening?
Leavening is the process by which the dough rises during baking, causing it to expand and become fluffy. This is achieved through the introduction of gases (typically carbon dioxide) into the dough, which are produced by the yeast or baking powder reacting with other ingredients. The air bubbles created by the leavening agent get trapped in the dough, giving your bread its structure and texture.
There are several methods for leavening bread:
- Yeast (natural or commercial)
- Baking soda or baking powder
- Sourdough starter
Each method has its unique characteristics and results, so understanding where and how to leaven bread can help you choose the best method for the type of bread you want to make.
 Where to Leaven Your Bread for Best Results
The environment in which you allow your dough to rise (or proof) plays a significant role in the bread’s final texture and taste. Temperature, humidity, and air circulation all affect the leavening process. Here are the best places to leaven your bread:
1. Warm, Draft-Free Environment
The ideal temperature for yeast to thrive and ferment the dough is around 75°F to 80°F (24°C to 27°C). If your kitchen is cooler than this, you may need to find a warmer spot to allow your dough to rise effectively.
Where to find warmth:
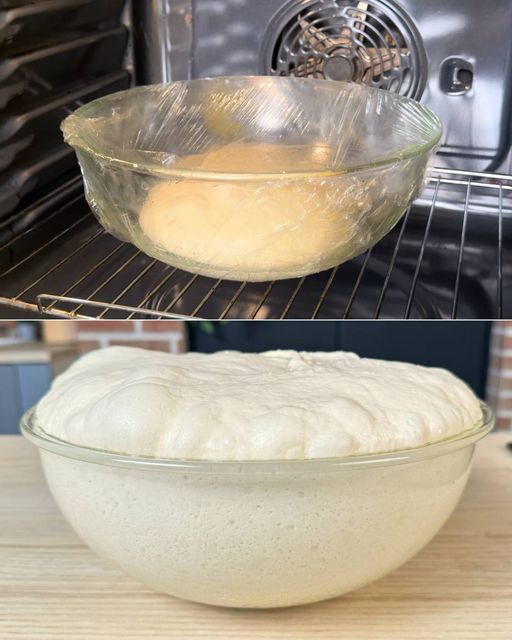
- Oven with a light on: Simply place the dough in a lightly heated oven with just the oven light turned on. This will create a cozy, warm environment for the dough without turning on the heat.
- Near a stove: If you’re baking something else, the warmth from the stove or oven can create an ideal space for your dough to rise.
- A sunny windowsill: If it’s a warm day, the sunlight streaming in through a window can provide the gentle warmth your dough needs to rise.
2. Bread-Proofing Box
If you bake frequently, a bread-proofing box (or dough proofer) is a great investment. These specialized boxes maintain a consistent temperature, ensuring your dough rises evenly and predictably. Some proofing boxes even have humidity control to keep your dough at the perfect moisture level.
3. Microwave with a Cup of Hot Water
If you don’t have a proofing box or an ideal warm spot in your kitchen, a microwave can serve as a great makeshift rising space. Simply fill a microwave-safe cup with hot water and place it in the microwave along with your dough (don’t turn on the microwave). The steam will create a warm, humid environment for your dough to rise.
 How to Leaven Your Bread for Perfect Results
Once you’ve found the right location for your dough, here’s how to ensure your bread rises perfectly:
1. Using Active Dry Yeast
If you’re using active dry yeast or instant yeast, it’s important to activate it correctly. Here’s how to do it:
- Activate the yeast: If using active dry yeast, dissolve the yeast in warm water (around 110°F or 43°C) with a pinch of sugar. Let it sit for about 5-10 minutes until it becomes bubbly. Instant yeast doesn’t need activation, and you can mix it directly into the dry ingredients.
- Mix your dough: Combine the activated yeast (or instant yeast), flour, salt, and any other ingredients (like sugar or oil) to form your dough. Knead it until it’s smooth and elastic.
- First rise (bulk fermentation): After mixing the dough, shape it into a ball and place it in a greased bowl. Cover the bowl with a clean towel or plastic wrap to prevent drying out. Let the dough rise for 1-2 hours in your warm, draft-free spot, or until it doubles in size.
- Punch down and shape: After the first rise, punch down the dough gently to remove excess air, then shape it into a loaf or divide it into rolls.
- For Complete Cooking STEPS Please Head On Over To Next Page
ADVERTISEMENT
ADVERTISEMENT
