ADVERTISEMENT
Homemade Digestive Biscuits: A Simple and Delicious Treat
Digestive biscuits are a beloved snack in many households, cherished for their crumbly texture and slightly sweet, wholesome flavor. Perfect for tea time, as a quick breakfast, or as a satisfying snack, these biscuits are both comforting and versatile. While store-bought versions are convenient, there’s something truly special about making your own homemade digestive biscuits. Not only are they fresher and more flavorful, but they also offer a chance to customize the ingredients to your liking.
In this article, we’ll show you how to create these crispy, slightly sweet biscuits from scratch with simple ingredients you likely already have in your pantry. Plus, we’ll explore the history of digestive biscuits and why they’re so popular around the world.
What Makes Digestive Biscuits So Special?
Digestive biscuits have a rich history dating back to the late 19th century in the UK. Initially created for their supposed digestive benefits (thanks to the use of whole wheat flour and baking soda), these biscuits quickly became a staple snack for tea lovers and biscuit enthusiasts worldwide. Their name “digestive” reflects the belief that these biscuits could aid digestion, although there’s no real medicinal benefit from eating them.
What sets them apart from regular cookies is their slightly crumbly, short texture, and their subtly sweet flavor with a hint of whole-wheat earthiness. Digestive biscuits are often enjoyed with a cup of tea or coffee, making them the perfect companion for a cozy afternoon snack.
Why You Should Make Homemade Digestive Biscuits:
- Fresher and More Flavorful: When you make your own digestive biscuits, you get to enjoy them at their freshest, with no artificial preservatives or unnecessary additives. Plus, they taste much better!
- Customizable: You can tweak the recipe to suit your preferences, whether you want to add more sweetness, use alternative flours, or incorporate different spices like cinnamon or nutmeg.
- Easy to Make: Homemade digestive biscuits are surprisingly simple to make, and the ingredients are likely things you already have in your kitchen.
- Healthier Option: By controlling the ingredients, you can create a version with less sugar, no artificial flavoring, and higher-quality fats, making these biscuits a healthier choice than store-bought varieties.
- Great for Sharing: These biscuits are perfect for sharing with family, friends, or guests at your next tea party. They also make a thoughtful homemade gift!
Ingredients for Homemade Digestive Biscuits:
- 1 1/2 cups (190g) whole wheat flour (for that characteristic earthiness)
- 1/2 cup (65g) all-purpose flour
- 1/4 cup (50g) unsalted butter, cold and cubed
- 1/4 cup (50g) brown sugar (or use white sugar for a less rich flavor)
- 1/2 teaspoon baking soda
- 1/4 teaspoon salt
- 2 tablespoons milk (or water, for a lighter texture)
- 1/2 teaspoon vanilla extract (optional, for a hint of sweetness)
Instructions:
1. Prepare the Dry Ingredients:
In a large mixing bowl, combine the whole wheat flour, all-purpose flour, baking soda, and salt. Whisk the ingredients together to ensure they’re evenly distributed.
2. Cut in the Butter:
Add the cold butter cubes to the dry ingredients. Using your fingertips or a pastry cutter, rub the butter into the flour until the mixture resembles fine breadcrumbs. This step is essential for creating the crumbly texture of the biscuits. If you have a food processor, you can pulse the butter and flour together for a quicker method.
3. Add Sugar:
Stir in the brown sugar (or white sugar, depending on your preference) until it’s fully incorporated. If you want to add any additional spices like cinnamon or nutmeg, this is the time to do so!
4. Add Wet Ingredients:
Make a well in the center of the flour mixture and pour in the milk (or water). Add the vanilla extract if using. Mix everything together with a spoon until a dough forms. If the dough feels too dry, you can add a little more milk, one teaspoon at a time, until it comes together.
5. Knead the Dough:
Turn the dough out onto a lightly floured surface and knead it gently for a minute or so until it’s smooth. Don’t overwork the dough, as this can make the biscuits tough.
6. Roll Out the Dough:
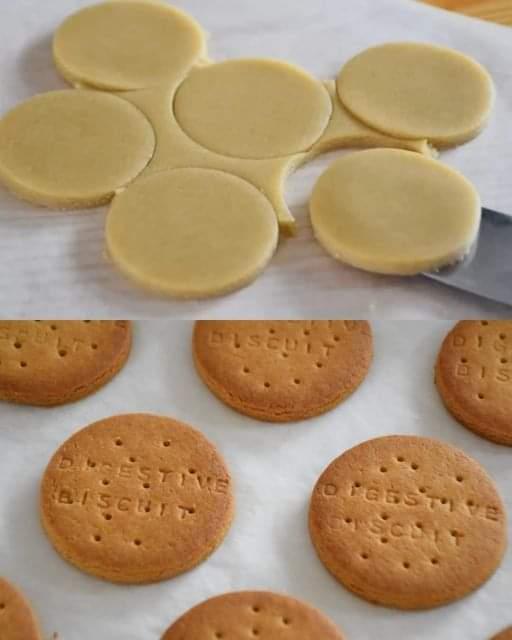
Roll the dough out to about 1/4 inch (6mm) thick. If you prefer thicker biscuits, you can roll them out a bit thicker, but keep in mind they will need a longer baking time.
7. Cut the Biscuits:
Using a round cookie cutter (or any shape you prefer), cut out
